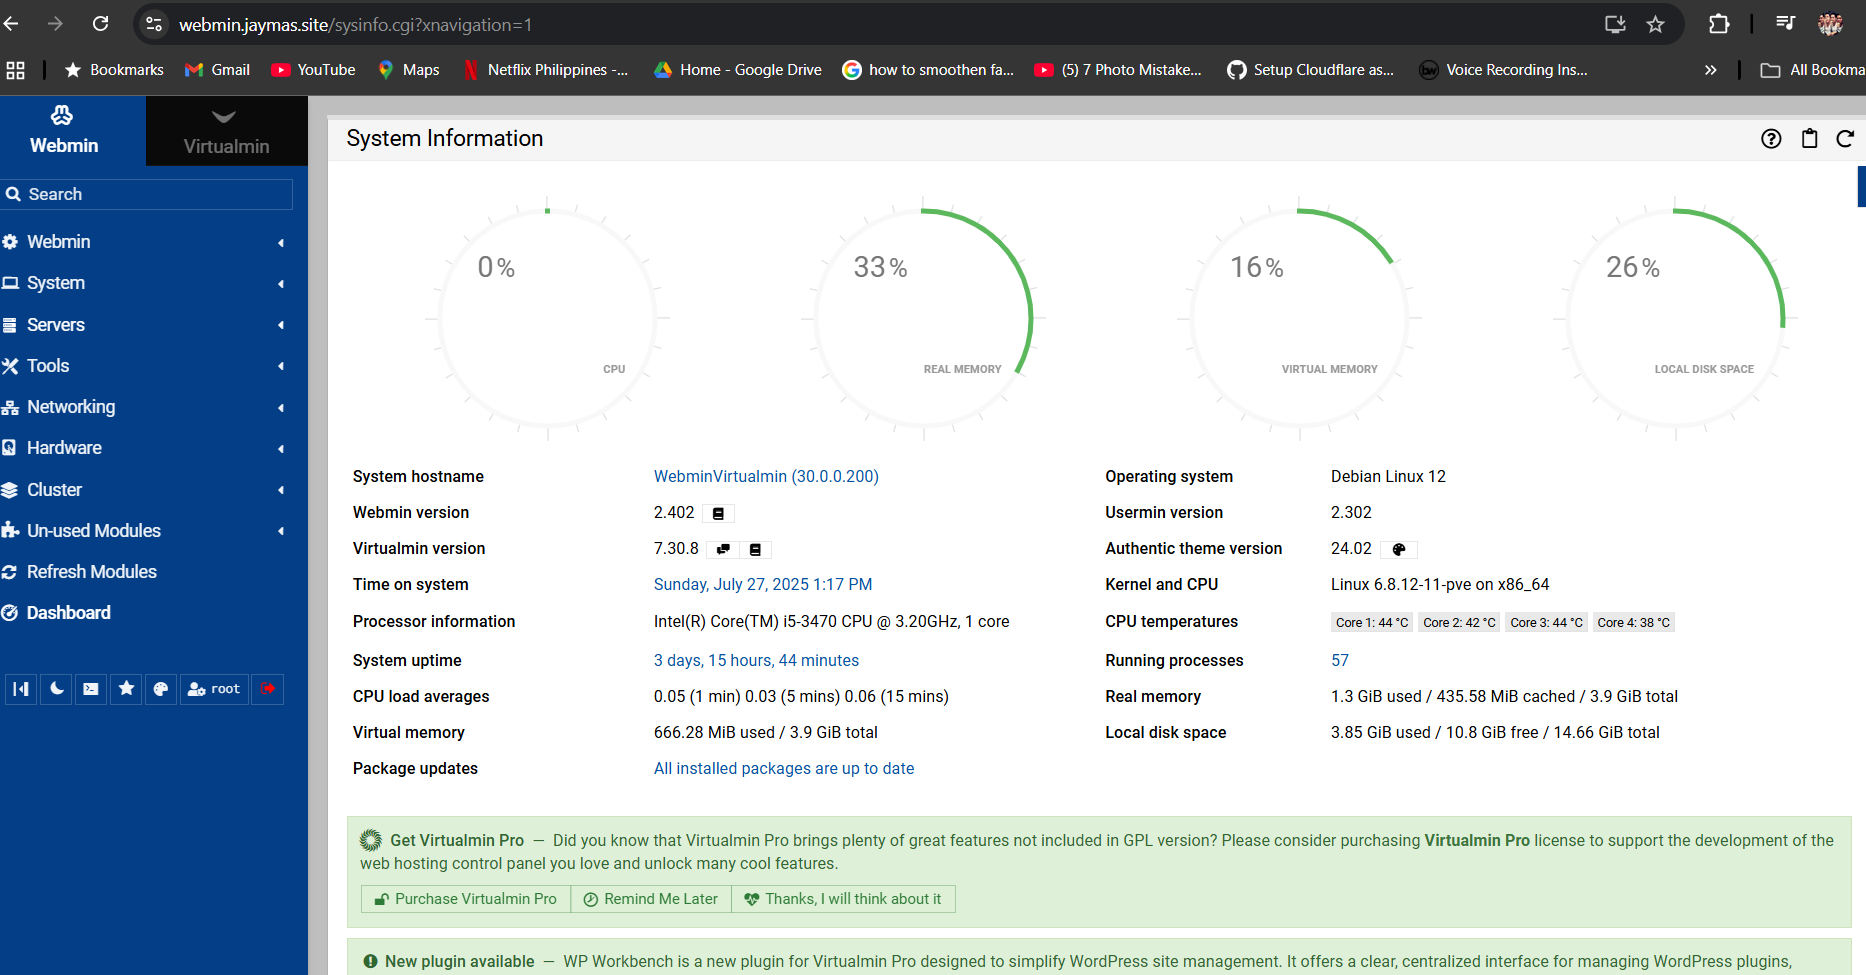
PusH YouR-Self BeYond YouR Limit
Welcome to my IT journey! I started as a self-taught, enthusiast, driven by curiosity and a passion for technology.
Deploying my first website using Cloudflared Pages was both exciting and a learning experience. I started by preparing my static site files, ensuring they were optimized and ready for deployment. Setting up Cloudflared was straightforward—I configured my repository, linked it to Cloudflare, and defined the deployment settings. When I pushed my changes, the automated build and deployment process kicked in, seamlessly hosting my site on a secure and globally distributed infrastructure. Watching my site go live with Cloudflare’s edge network felt incredibly rewarding, marking a milestone in my journey as a self-taught IT enthusiast.
For my second web deployment, I set up a LAMP stack (Linux, Apache, MySQL, PHP) on an AWS EC2 instance, taking a more hands-on approach to web hosting. After launching an EC2 instance with Amazon Linux, I configured security groups to allow HTTP and SSH access. Installing the LAMP stack was straightforward—I set up Apache as the web server, MySQL for database management, and PHP for dynamic content processing. To enhance scalability and storage management, I integrated Amazon S3, using it to store and serve static assets like images and files. This setup provided more flexibility compared to my previous deployment, allowing for dynamic content and database-driven applications, while S3 ensured efficient media handling. Despite the learning curve of managing server configurations, this deployment gave me deeper control over my web environment and a valuable experience in cloud infrastructure.
For my third deployment, I repurposed an old PC to build a home server using Proxmox, making it a cost-effective and powerful setup. To manage web traffic efficiently, I installed Nginx as a reverse proxy, allowing me to route requests smoothly while optimizing performance. To ensure secure remote access from anywhere, I integrated Cloudflare Tunnel, eliminating the need for complex port forwarding and improving security. For my WordPress deployment, I opted for a TurnKey Linux template, which provided a lightweight and hassle-free setup with essential configurations pre-installed. This approach allowed me to host my own self-managed WordPress site with minimal resource consumption while maintaining full control over my server environment. The entire setup transformed an old machine into a functional home web server, proving that with the right tools, you can create powerful systems without breaking the bank
Hi 👋I'm Jay Mascariñas
Web Hosting/ Developer
Hello! I’m a self-taught web hosting and development enthusiast with hands-on experience managing Proxmox servers, configuring secure Cloudflared tunnels, deploying Nginx reverse proxies, and building responsive, user-centered websites using WordPress, HTML, and CSS.

Software/App that I used:


Experienced IT professional specializing in Proxmox virtualization, NGINX reverse proxy management, and Cloudflared tunnels for secure remote access. Skilled in Docker containerization to streamline deployments and optimize server performance. Knowledgeable in WordPress setup and management using a LEMP/LAMP stack on Proxmox, ensuring high availability and efficiency. Passionate about network security, system administration, and cloud technologies, with a proven track record of optimizing infrastructures for performance, scalability, and security.
My Home server setup and configuration:
Proxmox:
I’m using Proxmox for my home lab server setup. It’s an open-source platform that makes it incredibly easy to manage virtual machines. I also use it to host a website through WordPress. For added security and public accessibility, I’ve configured a Cloudflared tunnel to establish a secure connection.
Cloudflared Tunnel:
Cloudflared Tunnel is a secure way to expose your local services (like websites, APIs, or SSH) to the internet without opening ports or needing a public IP address. Instead of accepting inbound traffic, the cloudflared
daemon on your server creates an outbound-only connection to Cloudflare’s global network. This tunnel acts like a private bridge between your server and Cloudflare, allowing external users to access your services through Cloudflare’s edge — safely and efficiently
Docker Container/Portainer:
Using Docker containers for your home lab is a smart choice because they let you run multiple isolated apps or services on the same system without interfering with each other. Containers are lightweight, fast to spin up, and easy to manage, making experimentation and deployment more efficient. Plus, with Docker’s portability, you can replicate or migrate your lab setup across different machines with minimal hassle. It’s like building your own mini data center—but without the bulk.